Conveyor Maintenance Checklist
March 10, 2023
3 Benefits to Completing a Conveyor Belt Survey
July 17, 2023
A laced baler belt is only as strong as its fasteners, and fasteners are strongest when they are installed correctly. Service technicians at agricultural dealers should follow the steps below to properly install Alligator® Rivet Fasteners to baler belts.
SQUARE BELT ENDS
The first step in installation that is often overlooked is the squaring of the belt ends. Belts won’t track correctly if belt ends are crooked, even if every other step in the installation process is completed perfectly. So, in order to properly install Alligator® Rivet Fasteners, make sure to first square the belt ends.
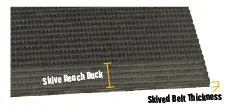
DON’T SKIMP ON THE SKIVE
Laying a good foundation is essential to quality work, and the belt skive is no exception. A good skive is to belt fasteners what a good windrow is to a hay bale. This is one of the most common mistakes made when installing belt fasteners because it takes proper tooling, training, and time to do it the right way. While it might be tempting to skip this tedious step, it will help ensure that your Alligator® Rivet Fasteners are installed properly the first time, saving you time and money in the long run.
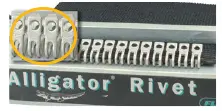
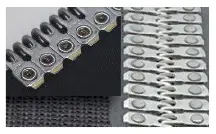
INSTALL ALLIGATOR® RIVET FASTENERS LACE UP
If you look closely at a strip of Alligator® Rivet lace, you’ll notice tiny alligators embossed in the steel on one side. When you place the fastener strip in the Alligator® Rivet tool, make sure that the alligators are facing up. If you don’t, the rivets won’t set properly, and the splice will fail prematurely. (Note: Alligator® Rivet Low Profile fasteners are embossed with “Flexco” instead of alligators.)
TAP FASTENER PLATE DOWN
Belt fasteners work best when the legs on the fastener strip are parallel to each other. The throat of the fastener strips are slightly open to make it easier to fit on the belt. Once you have positioned the belt into the lace on the tool, tap the fastener plate down. Then, tap the strip down so the legs are touching the belt.
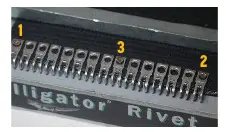
DRIVE ALLIGATOR RIVETS IN THE PROPER ORDER
The order rivets are installed is where many people undo the work of squaring their belt ends. When you drive rivets through the belt, it will displace some of the rubber. If you install the rivets from left to right, you will push the rubber to the right for every rivet, and the end result will be a crooked end and a belt that won’t track straight on a baler. To avoid this common mistake, it is important to control the flow of the rubber by installing the rivets in a particular order and a particular way.
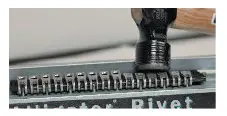
USE CORRECT FORCE TO SET THE RIVETS
If you don’t set the rivets with enough force, they can start popping out of the splice, causing the fasteners to fail. Use enough force to set the rivets so that the legs of the fasteners are parallel. For a proper set, the tool must be on a solid surface and the pilot nails cannot be removed from the tool until completion. If you hammer at the rivets without the tool and pilot nails, you’ll undo your work. However, if you’re using an air hammer, you’re likely using too much force to set the rivets. When setting Alligator® Rivets pneumatically, the pressure should not exceed 85 psi.
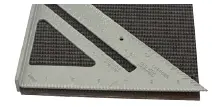
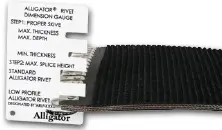
CHECK YOUR WORK WITH AN ALLIGATOR® RIVET APPLICATION GAUGE
Using the application gauge can help you avoid many of the mistakes discussed above. The gauge lets you know if the belt is too thick or too thin, how far back you need to skive the belt ends, and the maximum height of the finished splice. If you can pass all of the tests on the gauge, you likely have a well-installed Alligator® Rivet splice.
Whether your round hay baler needs a new baler belt or you have questions about repairing an existing belt, our Motion Conveyance Solutions™ team is ready to assist. Contact us today to learn more about our baler belting products and programs.
CONTACT US AND LEARN MORE ABOUT PRODUCTS & SOLUTIONS